Friday, June 06, 2008

Mutable notes with Basket Notepad

Move away from conventional linear note-taking and be more productive with this neat little application that takes note-taking to the next level.

The name of the application is Basket Notepad, http://basket.kde.org. Although it looks like it's specific to KDE only.

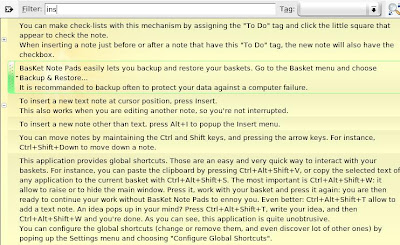
The application makes use of text boxes for your notes. However, you can also put images and links and it even has a built-in screen capture feature to quickly capture a screenshot and put it on your notes.


It's got a quick filter / search feature to quickly search your notes.
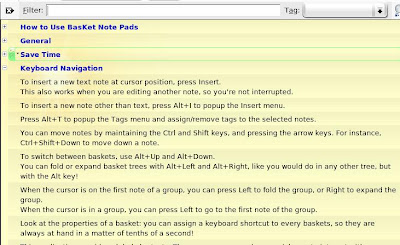

The application sits nicely on your task bar as an icon. With a CTRL+ALT+SHIFT+W keyboard shortcut, you can quickly summon or banish the Basket Notepad window.

Some nice features: (Copied almost verbatim from their website.)
  1. Click 'n' type
  2. paste images, links, email addresses, files, application launchers, colors, grab a screen zone, pick a color from screen
  3. Organize your notes in a hierarchy of baskets, by topic or project. Group notes together, collapse non-important groups... You can also let the application automatically layout your notes in columns or you can manually place them precisely.
  4. Attach tags to any note you take: "Important", "Information", "Idea", "Work", "Personnal"... Tags change the appearance of notes, and multi-state tags let you create checkboxes for To Do lists, progress-bars, priority-meters, etc.
  5. Instantly find your notes by word or by tag, as you type, no matter where you placed the important information you're searching for.
  6. The application is always running in the background, minimized to a system-tray icon. Writting down new ideas is one click away. Or one keyboard shortcut away, if you prefer. You can also drop things onto that icon, or use the numerous keyboard shortcuts to quickly append data to your baskets.
  7. Your notes are automatically saved as soon as you modify them. No need to manually save them: you will have to break your habit of pressing Ctrl+S every five seconds! To make your data ultimately safe, you can easily backup and restore your entire basket collection.
You can take a tour here.

I've enjoyed using this application and highly recommend it as your note-taking application. Say goodbye to those boring text-only linear notepad applications.

Basket Notepad, taking care of your ideas.

Friday, February 17, 2006

Setting up L.A.M.P.

This is how I setup Linux+Apache+MySQL+PHP on my Linux box. My goal is to setup a web-server that has support for php and talks to mysql. I want the servers to auto-run on my machine. I also want to provide a server space for multiple users. The users will have FTP access to their home sites for management. I'm building from source to stay clear from problems with pre-built binaries.

My system = Debian 3.0 on Mac iBook M5423, 2.4.30 kernel, 2.95.4 gcc, 2.12.90 binutils, 2.2.5 libc.... it's a pretty slow machine but it's good so I'd always keep performance in mind.

Be very careful choosing which versions to mix. I'm using:
PHP-4.3.0 + Apache 1.3.34 + MySQL Ver 11.18 Distrib 3.23.58

0. You can also get some instructions from:
http://www.lamphowto.com/lamp.htm http://www.hostlibrary.com/installing_apache_mysql_php_on_linux

1. Download apache source tarball.
2. Download mysql source tarball.
3. Download php source tarball.
4. Untar Apache source then do the following:
./configure
make && make install

5. Untar MySQL source then do the following:
./configure --prefix=/usr/local/mysql
make && make install

6. Untar PHP source then do the following:
./configure --with-mysql=/usr/local/mysql --with-apache=../apache_1.3.34/
make && make install

7. Go back to Apache source then do the following: (if libphp4.a does no exist, it will be created)
./configure --prefix=/usr/local/apache --activate-module=src/modules/php4/libphp4.a
make && make install

8. Go to PHP source then do the following:
cp php.ini-dist /usr/loca/lib/php.ini

9. Edit Apache configuration (httpd.conf) and add the following:
AddType application/x-httpd-php .php

10. MySQL does not allow root to launch the SQL server so you must use a regular user. I use, of course, dennis. Then do the following:
chown dennis /usr/local/mysql/var -R

11. Auto-start mysql server (on other distro, this should go to /etc/rc.d/rc.local).
echo "/usr/local/mysql/bin/safe_mysqld --log=/home/dennis/mysql.log --log-long-format > /dev/null &" >> /etc/init.d/rcS

12. Initialize the database.
/usr/local/mysql/bin/mysql_install_db

13. Start the server.
/usr/local/mysql/bin/safe_mysqld --log=/home/dennis/mysql.log --log-long-format > /dev/null &

14. Create new database
/usr/local/mysql/bin/mysql -u root -p
mysql> create database my_database;

15. Grant user access
mysql> select my_database;
mysql> grant all privileges on my_database.* to someuser@"192.168.XXX.XXX" identified by 'somepassword';
mysql> flush privileges;

Monday, September 05, 2005

OddMuse Wiki


For those who don't know what a wiki is, Google it yourself.

I came across this wiki engine on the internet. Actually, this wiki has been featured on Linux Journal magazine as well. It is written in Perl and uses flat files as database; no need to install and configure any external DB servers like MySQL.

The script can be downloaded from this site:

http://www.emacswiki.org/scripts/current

Save the script unto the web server's cgi directory. Name it anything you like (e.g. my_wiki.pl). Make sure it's executable (if this applies to you, I'm using Linux).

chmod +x my_wiki.pl

Make sure perl interpreter is up and running:

perl --version && which perl

Edit the script to reflect the correct perl interpreter path. If everything is properly setup, then try it out on your web browser:

http://your-ip-address/cgi-bin/my_wiki.pl

Enjoy!